
Machine Shop RFQ Form Design: From First Click to Estimator Handoff
KriXis editorial guide · Published October 14, 2026 · About 13 minutes to read
A buyer has read your machining capabilities and wants to ask about a part. Your website now has one practical job: help that person send enough information for the right next conversation. A vague contact box can leave an estimator chasing context. An exhaustive questionnaire can ask for decisions the buyer cannot make yet. A file uploader without clear instructions can create uncertainty about whether drawings arrived.
Machine shop RFQ form design connects the buyer's request with your estimating process. Start by deciding what information changes the next action, which drawing-sharing route your team supports, and who owns the request after submission. Then write the fields and messages around those decisions.
This guide covers the first request through the estimator handoff. It includes a field plan, drawing-route decision tree, receipt workflow and a fictional example you can adapt. It does not assume that more form submissions mean more suitable work.

1. Define what your RFQ form should start
An initial inquiry is not necessarily a complete quote package. One buyer may have an approved drawing and a purchasing deadline. Another may need an early manufacturability conversation before releasing a final design. Your page should make both paths understandable without promising a quote from incomplete information.
Name the primary action accurately. “Request a quote review” can fit a process that begins with scope checking. “Discuss a machining project” can fit early inquiries. Choose language your team actually uses, and explain what follows. Avoid a button that says “Get an instant quote” when a person will evaluate the request later.
Before designing fields, ask an estimator to walk through a recent, approved-to-discuss inquiry. Which information established process fit? Which missing fact prevented review? Which detail was helpful later but unnecessary at the start? Use these answers to distinguish essential first-contact information from optional context.
The form should follow useful machine shop capability pages. Carry the relevant page context into the request where your system supports it. A buyer arriving from a turning page should not have to explain how they found the shop before describing the work.
2. Choose fields by the decision they support
Every required field needs a reason tied to routing or review. A sensible starting plan includes a contact name, reply email, company or project organization, and a short project description. Your team may need additional information to distinguish machining work from unrelated inquiries. Validate that need with the people handling requests.
Ask about process, material, quantity and timing in terms a buyer can answer. A project description might say: “Tell us the component type, material if known, approximate quantity and timing.” Separate fields can make routing easier, but combining several mandatory questions into a large text box makes completeness hard to understand.
Make uncertainty an allowed answer
Offer “Not decided yet” or an optional explanation when a specification is unresolved. Distinguish a quote due date from a required delivery date. Allow quantities to be described as a prototype lot, an initial order or recurring demand. Do not force a buyer to enter an invented annual volume to reach the submit button.
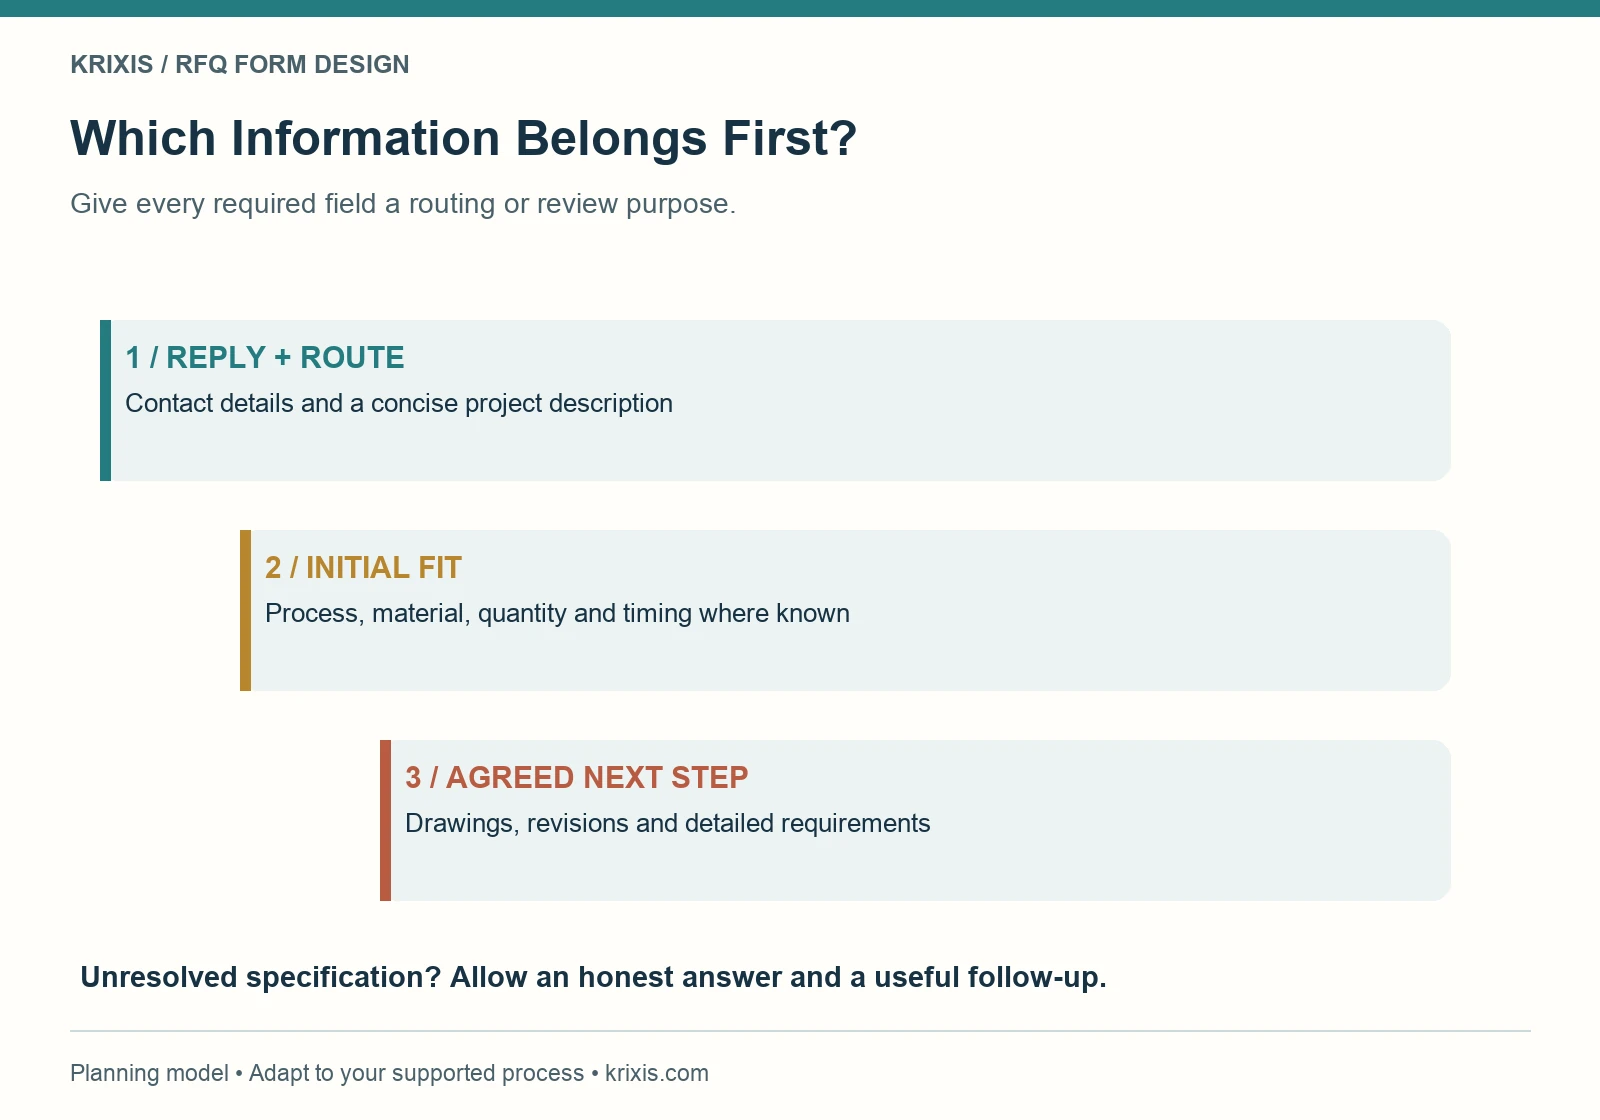
An illustrative field plan has three levels:
- Needed to reply and route: contact details and a concise description of the request.
- Helpful for the initial fit check: process, material, quantity, schedule and relevant documentation needs, where known.
- Handled through the agreed next step: drawings, revision details, detailed inspection requirements and commercial information requiring review.
This is a planning model, not a universal list of mandatory fields. A shop with a verified quoting portal may collect a fuller package immediately. A shop handling complex first conversations may need a shorter inquiry and a controlled follow-up.
Keep unrelated marketing questions out of the critical path unless they genuinely affect routing. A referral source can be optional. Marketing subscription consent should be a separate, clearly explained choice. Do not treat asking for a quote as agreement to receive a newsletter.
3. Write instructions that prevent a clarification loop
Useful instructions answer questions before the buyer guesses. Tell visitors what type of work the request route covers, what information helps the team begin, and how to share drawings. Explain file formats and size limits only after confirming the live system's actual settings.
Use visible labels that stay present while someone types. A placeholder such as “Enter email” disappears after input and is a weak replacement for a field label. W3C's labeling guidance explains how labels identify controls and associate their purpose with the input. Have your developer check those relationships in the implemented form.
Write helper text beside the relevant field. For timing, distinguish “When do you need a quotation?” from “When would parts be needed?” For a description, give a short example rather than a long list of specifications. Mark required and optional fields consistently, and explain any unusual restriction before submission.
Keep drawing context recognizable
Ask buyers to identify the part or assembly and the applicable revision through your supported process. Your estimator needs to know which files belong together. Avoid collecting several uploads with no way to describe their relationship. An initial request can reference a package that will be shared later; it should not imply that an unnamed attachment contains all necessary requirements.

Use plain wording for fit limits. If a service page identifies supported work, link to it. Do not make visitors discover an important exclusion only after completing the form. Clear scope language helps the buyer choose the right conversation and helps the estimator understand why the request arrived.
4. Choose a deliberate drawing-sharing route
File upload is a workflow decision with technical responsibilities. Before enabling it, identify who can access received files, where they are stored, how the team recognizes a successful upload and which retention process applies. Your technology owner should verify the implementation.
For a public uploader, confirm accepted file types and size limits, server-side validation, storage controls and the handling of unsafe files. OWASP's File Upload Cheat Sheet describes safeguards including allowlisted file types, size limits, safer storage and scanning where applicable. A browser-side file filter alone does not establish that an upload is safe.
Do not call an upload route “secure” merely because the page uses HTTPS. Describe the supported route accurately and let the responsible specialist assess the controls. Keep requirements involving restricted data or special contractual handling with the appropriate internal reviewer; a marketing form cannot establish that a shop meets those obligations.
Provide an alternative when files are not ready
If the buyer needs an NDA discussion or an approved transfer method first, provide a way to request that next step without attaching drawings. Explain that the initial message should contain a non-confidential summary. A direct email inquiry can start the conversation, but ordinary email should not be presented as suitable for every technical package.
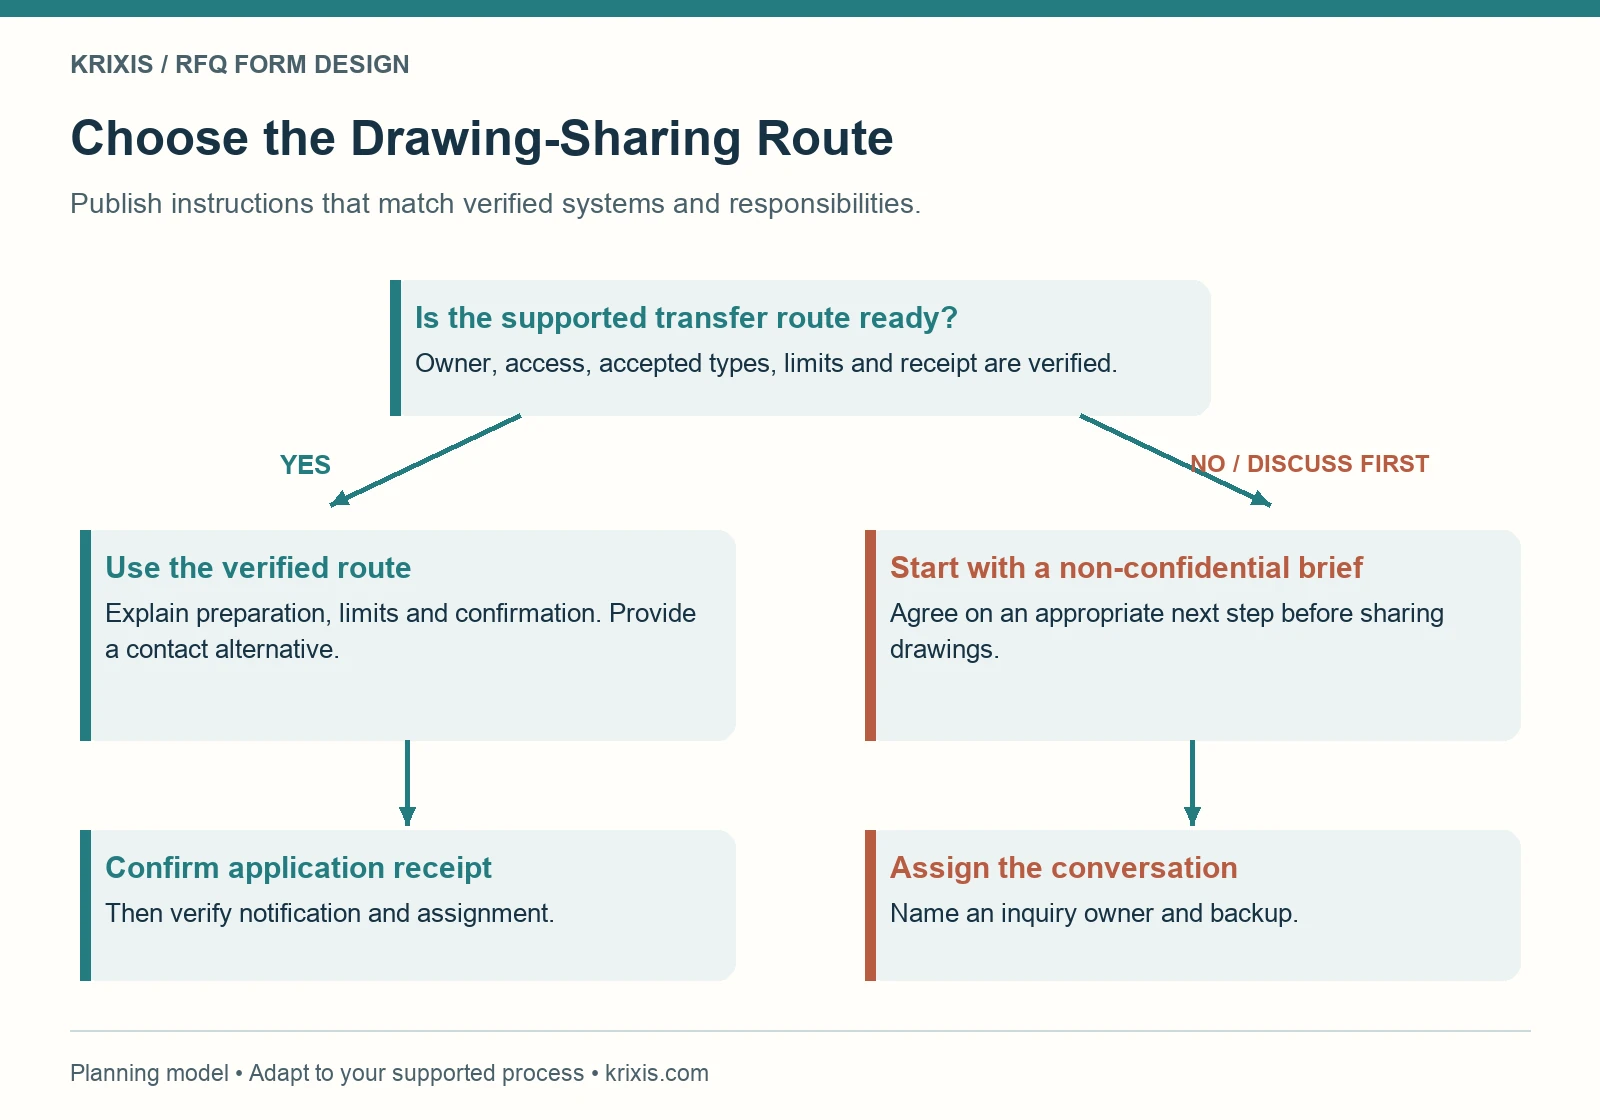
Your public instructions should match the chosen route. For example: “Send a non-confidential project summary. Our team will discuss the appropriate drawing-sharing method.” Use this only if someone actually owns that conversation. When a working portal is available, link to its verified entry point and explain the information the buyer should prepare.

5. Design the receipt and routing together
Submission feedback should tell the buyer whether the request was received by the application and what to do next. It should not imply that an estimator has reviewed the files or accepted the job. Separate these stages in your wording and in your internal record.
A useful confirmation can identify the request reference, summarize the next step and provide a contact route if the buyer needs to correct information. Publish a response-time statement only when the team can support it. Avoid a fixed turnaround promise copied from another shop's website.
Internally, decide who receives the notification, who checks it, who covers absences and where request status is recorded. A shared inbox needs an owner just as a CRM queue does. Record enough context to connect the request with the relevant page and buyer conversation, while limiting access to technical files appropriately.
The machine shop CRM guide explains the broader organization of RFQs and follow-up. After the request is visible to the right person, use the lead qualification guide to assess fit. Keeping these stages distinct makes it easier to locate a failure.
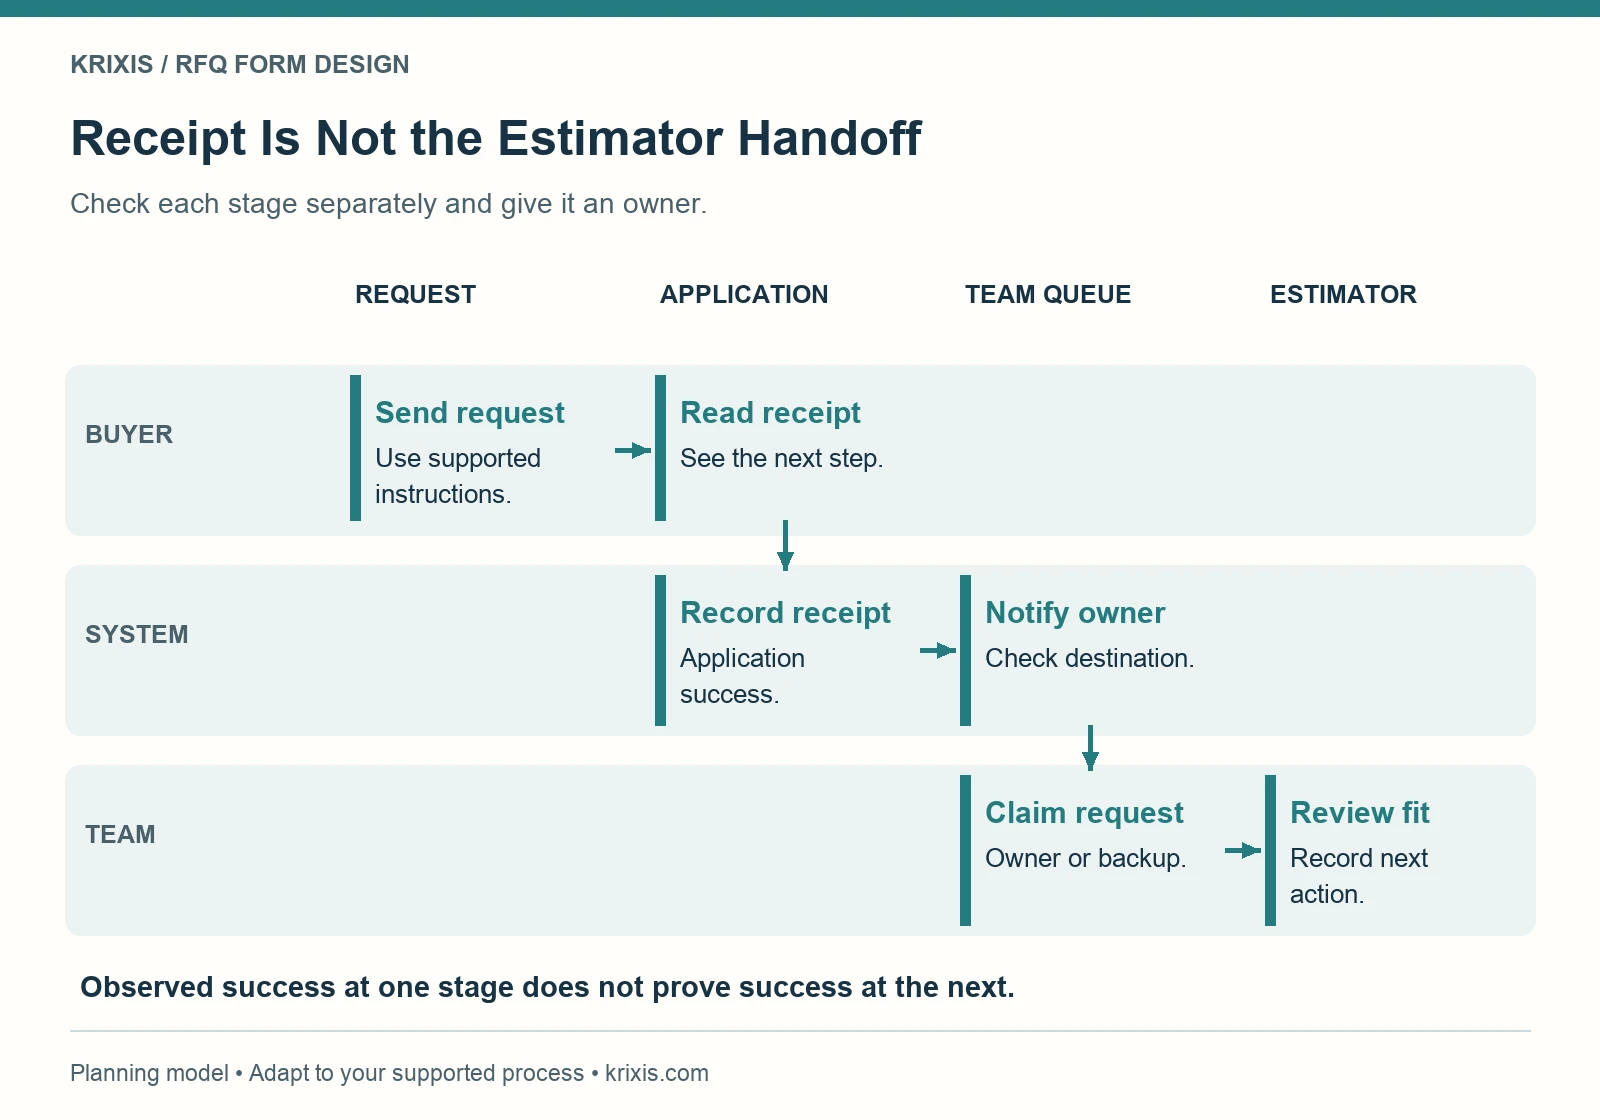
An application success message, an email notification and an estimator assignment are separate events. Test each one. A form can appear to succeed while a notification is filtered or a recipient is unavailable. Use an authorized, non-confidential test request and verify its presence at the intended destination before claiming delivery works.
6. Test failures as carefully as success
Start with a small test plan that follows real visitor behavior. Try the form on desktop and a phone-sized screen. Use only a keyboard for one pass. Check labels, required-field instructions, visible focus, button access and whether entered information survives a correctable error.
Try an omitted required field and a mistyped email. The response should identify the problem and explain how to correct it. W3C's notification guidance covers feedback that helps people understand errors and successful submission. Ask your developer to verify how messages are announced to assistive technology as well as how they look.
For uploads, test the supported formats and the advertised limit with approved test files. Check an unsupported format and an oversized file without using malicious content. Verify that the visitor gets a useful explanation and can continue. If CAPTCHA is present, check its real visitor experience and available alternatives with the system owner; do not disable it just to make a test pass.

Write down the test date, device or viewport, observed result and responsible owner for each issue. Recheck the route after plugin updates, email configuration changes or changes in staffing. Treat a working confirmation screen as one observation in the test record, not proof of the whole workflow.
7. A fictional example: revise one crowded request page
Consider a fictional small shop whose inquiry page requires a drawing upload, annual volume, exact material grade and required delivery date for every visitor. Its estimator also receives no indication of which service page the buyer viewed. This example illustrates a design review; it is not a KriXis client result.
The team reviews the fields against two paths: a buyer with a released drawing and a buyer asking about an early prototype. They keep contact details and a short description required. They provide optional material and quantity context, distinguish quote timing from delivery needs, and allow the buyer to request a drawing-sharing discussion.
The revised page explains that a request begins with review. It links to relevant capabilities, describes the actual file route and names a maintained contact alternative. Internally, the team assigns an inquiry owner and backup and records a successful receipt test separately from the estimator's fit decision.
No conversion increase is assumed. The first useful comparison is operational: are visitors encountering errors, are the received requests understandable, and can the estimator identify the next step? Those observations guide the next adjustment. Any commercial outcome must come from the shop's own records.
8. Measure the request path without collecting drawing content
Define what each event means before installing tracking. A button click indicates intent to start. A form start indicates interaction. A verified successful submission indicates application receipt. A qualified inquiry and a quoted project require later business records. Avoid counting a confirmation-page view as qualified work.
Keep analytics events limited to appropriate metadata. Do not send drawing contents, filenames containing sensitive details, project descriptions or contact-field values into general marketing analytics. Ask the implementation owner to inspect the actual event payloads. Tracking should help diagnose the path without creating an unnecessary copy of buyer information.
If volumes are small, review individual approved records and clarification patterns rather than drawing sweeping conclusions from a short date range. Note the period, changes made and limitations. The marketing ROI guide connects request activity with later quote and won-work stages without treating them as interchangeable.
Common questions about machine shop RFQ forms
How many fields should the form have?
There is no fixed count that fits every shop. Include the information needed to reply and choose the next action. Make later-stage information optional or collect it through a supported follow-up when that matches your process.
Should buyers have to upload a drawing?
Only when a drawing is required to begin your supported request path. Provide clear instructions and an appropriate alternative for early inquiries or situations needing a prior transfer discussion. Verify the upload controls before relying on them.
Does a shorter form always produce better leads?
No. Removing a field may reduce effort while also removing useful context. Review completeness, errors and qualification outcomes together. Design around useful requests rather than a submission total alone.
Is there an ideal word count for this guide or our request page?
Google's helpful-content guidance states that Google has no preferred word count. A request page needs concise instructions; a planning article can explain the decisions and tests in more depth. Use the space the reader's task requires.
Start with a field map and an owned next step
Pick one request route and trace it from a capability page to the estimator. Write down the purpose of every field, the drawing-sharing instructions, the receipt message and the people responsible for handling it. Test that route and record what actually happens.
The free planning kit below turns those decisions into a field inventory, message draft and verification log. Use it to create a clear first request, then maintain the path as your systems and team change.

Trackbacks & Pingbacks
[…] a detailed field plan, drawing-sharing instructions and receipt tests, use our machine shop RFQ form design guide and its free planning […]
Leave a Reply
Want to join the discussion?Feel free to contribute!